Tuesday, February 18, 2014

Honey Spice Mushroom Cookies - Lithuanian - with & without cookie irons


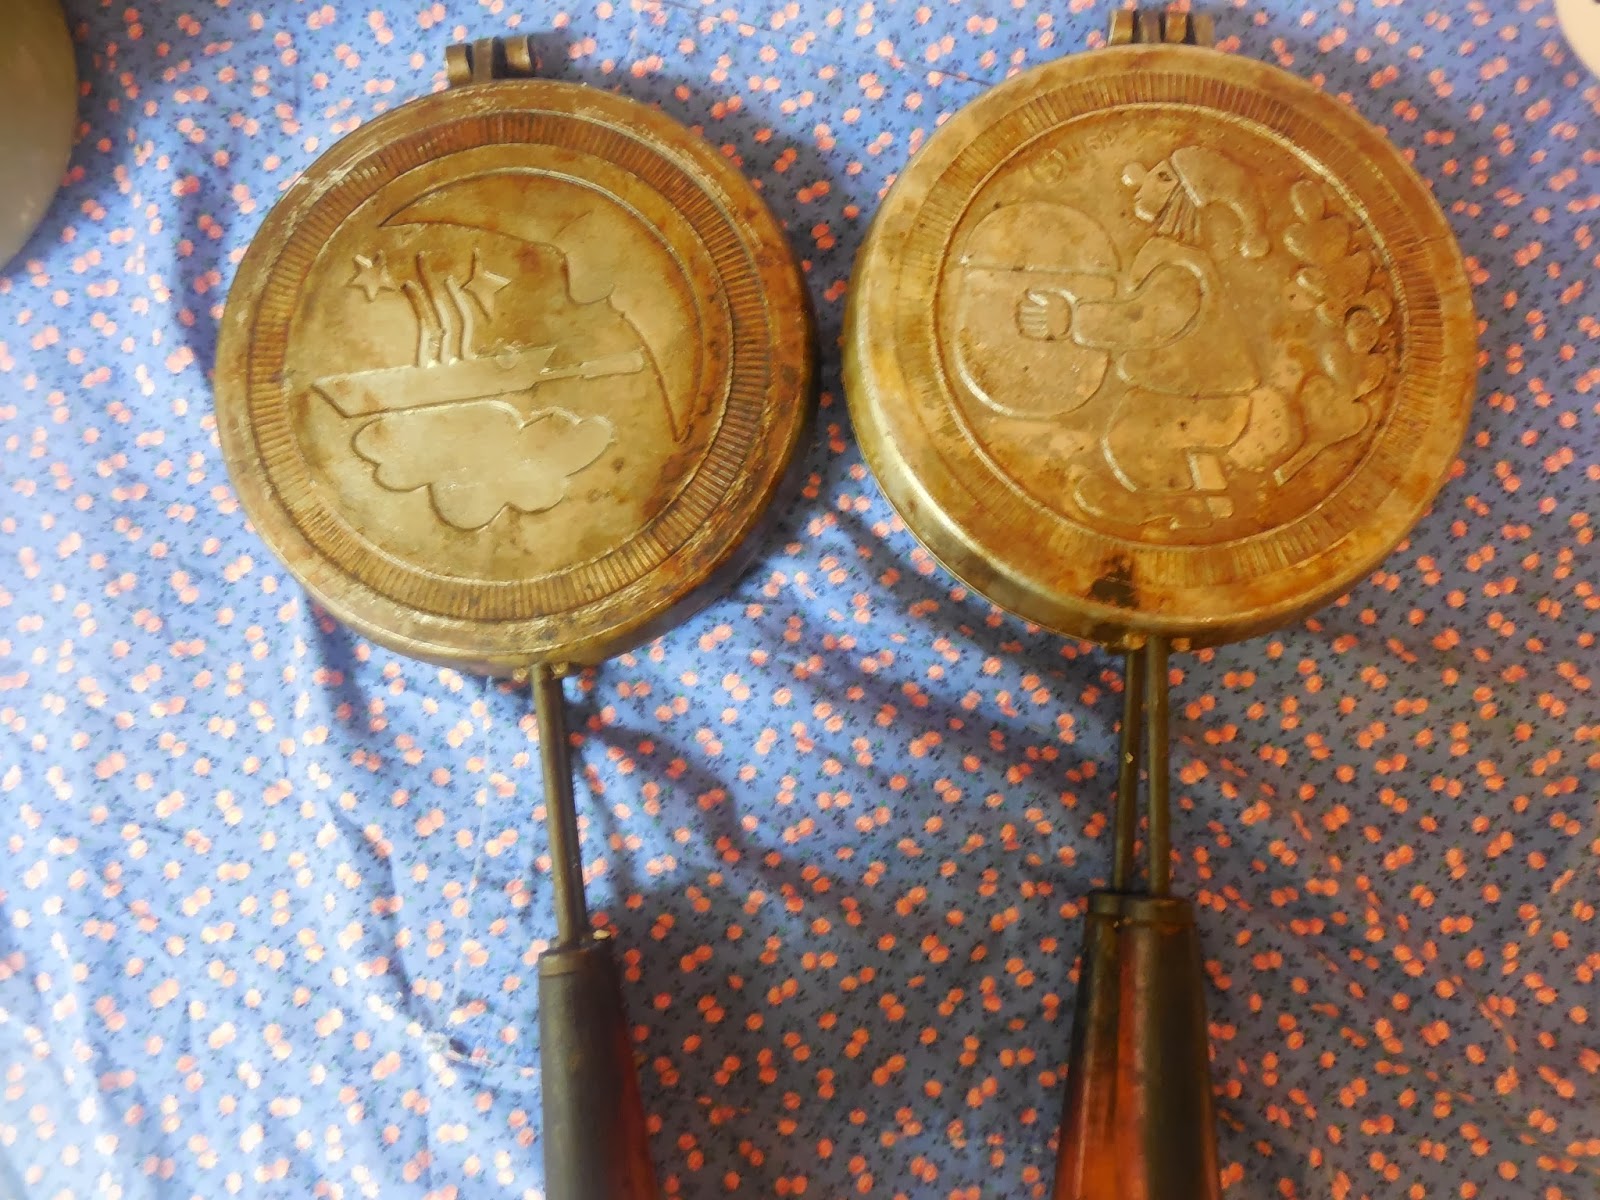
I have long been intrigued by a set of 3 cookie irons we inherited from my Lithuanian grandmother.  They had the name of a Lithuanian town on one- Druskininkai.  2 had forms for solid 3D mushrooms, and one had forms for 3D farm animals.  I found that the Lithuanians made a honey mushroom cookie- which felt correct to make in the mushroom shaped pans.  I could only find one recipe online at that time and it was not cooperating.  The first recipe I tried for these included Cardamom- cardamom smells beautiful, but it is a very strong spice and easily overpowers the other flavors in the cookie.  The recipe I chose this time had no cardamom- I like it much better.  Perhaps that's simply because it turned out.  You try it and see what you like- the Cardamom would be 1 tsp in this recipe.

Cookie Batter Ingredients
1/4 cup butter (room temp)
1/2 cup Sugar
2 Eggs
1/4 cup plain yogurt or sour cream (I did honey yogurt here)
3/4 cups honey (I did 1/2 cup honey)
4 cups all-purpose flour
1 1/2 tsp Baking Soda
1 tsp Cinnamon
1/4 tsp Allspice
1/4 tsp Nutmeg
1/2 tsp Ginger

Icing ingredients
2 cups powdered sugar
1/4 cup water
1 Tbsp lemon juice
1 Tbsp cocoa
Poppy seeds
(I didn't love my icing recipe- so I will likely tweak it next time- try vanilla instead of lemon or possibly use sour cream instead of water... I don't know how it will work, but I'm hoping to cut through the sweetness a bit)

1. Stir together flour, baking soda and spices.
2. In a separate bowl, cream together butter and sugar, add eggs 1 at a time, incorporating thoroughly after each addition.
3. Stir in the honey and yogurt.
4. slowly add the flour mixture & mix well.  Chill it in the fridge for 1 hour or overnight.
5. Preheat oven to 375 F, prepare cookie sheets with parchment or a silicone baking mat.
6. Scoop 1 Tbsp cookie dough and roll it into a ball, take the rod end of a wooden spoon and make an indent in the cookie.  I'd say, go for a good 2/3 through the cookie.  It's ok if it completely flattens while it's cooking.  The temperature of the dough has the most effect on its finished shape (make sure the dough is cold).
7. For the stems, roll 1/2 a Tbsp to 1 1/2" length & taper to a point on one end. Place these on a separate baking sheet.
8. Bake the caps for 10-12 minutes & the stems for 8-10 minutes.  For 90% of the caps, they closed too much and I had to use a knife and carve out a deeper hole.
9. Prepare the Icing- mix together the icing ingredients (except the cocoa & poppy seeds).  This is your glue.  dip the point of the stem in the icing and stick the other end in the hole of the cap.  I used a muffin tin to help support the mushrooms as they dried.  They lie diagonally in the muffin tin, the stem resting on the rim, the cap in the cup.  Once the glue has dried, you may decorate them.
10. To decorate: first, mix the cocoa into the icing.  Second, you may dip the caps in the icing & sprinkle a few poppy seeds over top.  Third, you may also dip the bottom of the stem in the icing and dip it in the poppy seeds.


Cookie Iron directions:
If you are cool like me and have a set of cookie irons, then spray some cooking spray on each side, and smush cookie dough into 1/2 of the mold.  Put them on the stove over med-high heat for 1-2 minutes per side.  Voila, perfect little cookies.  (These will be slightly more dense than the version cooked in the oven.)

******************************************************************************

Secondary Cookie Iron Recipe:
I discovered that the cookie irons were originally suited for a different cookie.  A Russian cookie similar to their Oreshki "little walnuts".  Except, instead of a hollow walnut shaped cookie (which gets filled with caramelized sweetened condensed milk), these irons made a 3D solid cookie.  They advertised that if you bought the cookie irons from this Russian manufacturer, they would give you the "Sweet Mushroom Cookie" recipe.  I was unable to find this recipe elsewhere on the internet.  I did however, find a video on youtube which features a person making the cookies- with no sound and no written directions.  I watched carefully and tried to discern the foreign ingredients & inexact measurements and I'm pretty proud of what I came up with.  It's very yummy.

Oreshki Style Sweet Mushroom cookie (solid)
2 Sticks Butter (1 cup)
2 Eggs
1 tsp Vanilla
1-3 Tbsp Sugar
1 Tbsp Baking powder
1 tsp Vinegar
2-3 Cups flour

1. Mix together the butter, eggs, sugar, and vanilla.
2. Add the Baking powder and vinegar.  Mix again.
3. Add enough flour to make a workable dough (thick, not very sticky- a little sticky).
4. Spray some cookie spray on the cookie irons.
5. Smush portions into one side of the cookie iron & cook over your stove top at medium/medium high heat for 1-2 minutes on each side.  You may check them after 1 minute.

~Suggestion: Caramelize some sweetened condensed milk & use it as a dip for these cookies.  It is delicious!~

Blind Pigeons- Lithuanian Stuffed Cabbage Rolls- Balandeliai

I chose to do Lithuanian cooking in February because my dad is Lithuanian.  His grandparents immigrated in the 1900s.  My Grandmother was quite a good cook & this is one of the recipes my dad remembers eating.  I am a novice in the Lithuanian kitchen, so I'm making mistakes... like grating my potatoes wrong & using an embarrassingly small amount of eggs in my Kugelis & using a recipe variation which is less traditional- using crackers in the blind pigeons instead of rice (Grandma's had rice in them).  Oh well... I can adjust & do things more correctly next time.

Here is the recipe for Blind Pigeons:

1 large head of cabbage
5lb Ground Pork
2 tsp Seasoned salt
1 tsp Salt
1/2 tsp Pepper
1 tsp Ground Mustard
1 tsp Marjoram
3 Eggs
3 Cloves garlic
2 medium onions
1 Sleeve of crackers (or 1 cup of cooked rice)
3 Stalks of celery
7 cups of tomato puree (I used diced tomatoes and I pureed them with the immersion blender)
9 cups tomato soup
(Reserved 4 cups cabbage water)
Optional- Sourdough bread
Optional- Sour cream

1. Take your cabbage, place it upside down on your cutting board and hollow out the core with a knife.  Fill a stockpot with water and put your cabbage in- it should be enough water to cover the cabbage- but the cabbage will float at first.  You may add salt to this pot.  Bring the water to boiling and let it boil, covered for 10 minutes- then take it off the heat and let it rest while you prepare the meat.
2. Mix the seasonings into the pork (seasoned salt, salt, pepper, mustard, marjoram) using your hands.  In a blender, process the onion, garlic, eggs, celery, and crackers {if using rice- do not put it in the blender, just mix it into the meat}).  Pour this over the pork and mix it in thoroughly.
3. Place 2 big pots (stock pots if you have them) on the stove.  Put in each pot 3 1/2 cups puree, 4 1/2 cups tomato soup, and 2 cups of the cabbage water.  Turn heat to medium.
4. Assemble the pigeons! Pull the cabbage out of the water and place it on a big plate.  Carefully peal the leaves off of the cabbage (so you don't tear them).  Place the leaves in a pile on another plate.  Take 3/4 cups of the pork mixture and place it in the center of each cabbage leaf.  Fold the thick part over the pork, then the top of the leaf, then the sides.  Carefully lower it seam side down into a pot of tomato.  repeat with remaining leaves and meat until you can make no more.  Make meatballs out of the remaining meat & put the remaining little cabbage leaves in the tomato pots as well.  (You will likely run out of room and need to do these when the pigeons are all done).  
5. Cook the pigeons for (well, My recipe called for 3-5 hours- I did 3 & they were perfectly wonderful.  Other people's recipes call for cooking them for only an hour- I didn't try that. So, check them after 1 hour- they may be good).  Carefully remove the cabbage rolls from the pot.  I had to refold them as I took them out- no big deal.  Serve with a dollop of sour cream if you want and sourdough bread.

~You can make a smaller batch if you want; the recipe easily divides in thirds.  Just put the pigeons in the pot first & pour the tomato stuff over them.  Simmer for 1 hour.  It can also be done in a crock pot.~

My Review: This makes a ton of blind pigeons (ok- like 20-25).  We definitely had leftovers, but I'm not complaining- they are so good.  They remind me some of Eggplant parmesan- I think that the tomato sauce made the cabbage leaves magical. The meat smelled amazing as I was making it and it definitely delivered on flavor.  This is recipe turned out something that I would happily order in a restaurant and expect to pay like $12 or more.

The Cabbage Rolls & Sourdough

My husband put wings on his Pigeon.

Thursday, January 16, 2014

Mabo Tofu

I am showing both the cheater recipe and the full recipe.  We prefer the cheater recipe.  This is not a dish to miss out on.

Cheater Recipe:
Cook-Do MaboTofu Sauce Packet
Firm Tofu (cut into small cubes with knife)
1/4 cup chopped Green onion
1/4 lb ground pork

1. Brown the pork over med-high heat.
2. Add Tofu and Mabo Tofu Sauce- heat through.
3. Garnish with green onion.

Making your own Mabo Tofu sauce:
Ingredients:
1 Tbsp grated fresh Ginger (or 1-2 tsp powdered)
3 Garlic cloves, minced (about 1 1/2 tsp Garlic)
2 Tbsp Soy Sauce
1 Tbsp Fish sauce or Oyster sauce
1/2 cup chicken broth (or Dashi broth)
1 Tbsp Corn Starch
**optional 1 tsp- 1 Tbsp Hot chili sauce
** optional 1 tsp- 1 Tbsp Black Bean paste

1. Mix this all together & use it in place of the packet used in the above recipe.

Serve over Rice.
Enjoy!

Nikuman or Steamed Buns

This is a lovely little treasure.  Pillowy, somewhat sticky skinned steamed buns filled with whatever your tummy is craving.  I've had them with pork filling, teriyaki beef, and curry.  You can make them into a dessert recipe with some sweet red bean paste.  I found the recipe easy to follow.  I insist that if you attempt to make Nikuman, you watch this video & see how they're made.  This is not a recipe that is easily followed otherwise. The video features a french poodle who narrates the recipe as the Japanese lady next to him assembles.  Here are the main points to remember about making the bun part of the recipe:
Recipe for the buns with gram to cup conversion:
1 slightly heaping cup= 250 grams
1 tsp Baking powder= 5 grams
1 tsp yeast
5 tsp (or 1 Tbsp + 2 tsp) Sugar = 25 grams
1 Tbsp Sesame oil
1/2 cup Dashi water *to be precise to the ml conversion, you may add between 2 tsp and 1 Tbsp to this* 
                                    (1/2 cup water and 1/2 tsp dashi stock)

Now, Remember the following directions! 
1. To knead by hand for 10 minutes.
2. Then let the ball of dough rest in a bowl which is resting in pot of 104 degree water (I used a lidded pot) for 30 min.
3. Then section into 8 balls & let the balls of dough rest under a damp towel for 10 minutes.
4. Warm up a pot with about an inch of water- just so it doesn't rise to level of the steamer basket (have it warm, not boiling) & turn off the burner.  Put 4 Nikuman on wax or parchment paper and place them on a steamer basket in this warmed pot with space to rise.  Put the lid on the pot and wait 10-20 minutes.
5. Then turn the water to a boil.  Once it has reached a boil, turn off the burner and let the lidded pot rest for 15 minutes. ~Done!~

Other tips:
For a faster turn out of the steamed buns, stacked steamer baskets are sold.  This way you can steam more than 4 at a time.

I really loved the recipe provided by "Cooking with Dog".  The Nikuman were a fancy little treat & a definite must for our Japanuary.  I used leftover Curry for the filling.

Another Japanuary cheat -Corn Pizza

In Japan, they serve corn on their pizza.  The other day I was feeling quite burnt out and my husband used that little trick to keep Japanuary going.  It actually tastes good in my opinion- not like "what have I been missing!?!" good, but just the "Huh, this doesn't taste bad." kind of good.  So there's an option for cheating on Japanuary.

Monday, January 13, 2014

Cheaters Japanese Curry

I think this recipe counts as a cheat because I use prepared curry from a box.  It is one of our favorite dishes though and it's rather simple.  It's basically beef stew with a curry base served over rice.

Ingredients:
Rice
Golden crown box of curry seasoning
carrots
potatoes
meat of choice (pork, chicken, or beef)
onion
*any other vegetable you like in beef stew*

1. Start the rice in your rice cooker or however you prepare it.
2. According to the directions on the box- pour the appropriate amount of water in a pot & place the pot over medium high heat on the stove.
3. Cut up the vegetables. Add carrots and potatoes to the pot. I like to keep the onions separate and sautee them with the meat in a separate pot.
4. Once the carrots are soft, add the curry seasoning, cooked meat and onions.  Stir and simmer until it is the consistency you like.  I like mine fairly thick.

Scoop some prepared rice into a bowl and pour some of the curry over it.  Enjoy!

~If you have leftover curry, lucky you!  Stay tuned, I will be using curry in a steamed bun or "Nikkoman" more commonly known by it's Korean name "Dim sum".~

Kabobs

I am not sure if this one technically counts as "Japanuary" since my kabobs were not Japanese looking enough (says my husband), however, they were a huge hit with everyone in the family.  You will need to have skewers for this project.

Ingredients:
Apples (I used 3)
Chicken
Sweet potatoes
Onion
Teriyaki Sauce

1. Cut up the apples & sweet potatoes into 1/4-1/2" thick x 2" pieces, quarter the onion, and cut the chicken into approx. 2" pieces.
2. Stack the pieces on a skewer (for onions, I used pieces that were 3 layers thick).  Put finished skewers on a baking sheet.  Once finished assembling kabobs, pour teriyaki sauce over all of the skewers and place in a 400 degree oven for 20 minutes.

My kids really loved the kabobs.  It made for a very fun dinner- they were super yummy.  I'll definitely be making them again.