Saturday, June 14, 2014
Taking Breaks and Catching Up ~~ Thai love forever~~
Now it is summer vacation. I decided to wait until Summer to do Thai cooking. Thai food is my favorite. I have a fear of cooking with chilies and hot peppers. I am learning it is ok to let go of that fear, the peppers are not as hot as I think they are, especially when they get cooked. I picked up a Thai recipe book a while ago- it describes recipes rather than just listing them, it describes what the "authentic" ingredients are vs. the usual substitutions. I have made some Thai dishes before. I learned that palm sugar is an important flavor in sweet sticky rice. I also learned that Kaffir lime leaves smell like fruit loops and what Galangal is & how Tamarind paste is made... Thai cooking has a definite philosophy. I love it when a country has a cooking philosophy. They believe in balancing and hitting 5 different taste centers with each dish. Balancing acidity and creating a nice texture are also important. I find their cooking style so connected to the Eastern Medical/Religious ideologies. They talk about elements and balance and it is almost as if preparing food was a spiritually motivated practice- as we say in the west, "Good food comes from the heart." How divine: to cook from the soul, with passion and understanding and respect for ingredients. I honestly feel like I'm a fool in the kitchen- haphazardly putting foods together and hoping for the best. To cook with a real understanding of ingredients, their flavor and acidity and what magic they might infuse into a dish when balanced appropriately... that's my goal. I have found Thai food is the most philosophical food I have met, and therefore, it is also probably the best place for me to find the love and respect for ingredients that I have been seeking. I suppose cooking is like many other hobbies, to really get into it, you have to go in through your favorite door. Anyways, enough love poetry to Thai cuisine. I hope Thai month unlocks my inner cooking genius. Bring on the coconuts, lime, lemongrass, Thai chilies, fish sauce, and jasmine rice!
Tuesday, March 11, 2014
Potato Sausage
Potato Sausage

This is my second time making sausage. The first time it was a Lithuanian meat sausage which I made for a potluck picnic with the Portland Lithuanian Group. Making Sausage is very fun or maybe I'm just weird. The only part of sausage making which I'm not a huge fan of is any time I accidentally smell the casings. They just smell preserved and they smell like organic tissue. I discovered after much struggle with the mechanical sausage stuffer, that it only assists you properly when you're making a sausage with a fairly high meat content. What you don't see in these pictures is my kitchen covered in potato & me covered in potato- That is the mess you run into when you try to use the machine. I cleaned up to take the pictures below. I felt somewhat silly when I discovered how easy it was to stuff the casings without the machine. I got my casings from Cabelas. It is the cheapest/only distributor I could find.
This recipe makes the sausage filling and the gravy-- I highly suggest you make the gravy to go along with it.
Sausage
12 Russet Potatoes (Riced or Food Milled)
1 Large finely chopped onion
3 strips chopped bacon (or 3 Tbsp butter)
2 eggs
1/2 tsp marjoram
Salt & Pepper
Hog casings- rinsed 3 times (check the instructions on the bag containing the casings- it will likely tell you about rinsing and letting them rest in water for a while {a couple hours} to aid in their regaining elasticity & rinsing clean)
Bacon/Sour Cream Gravy
1/2 lb Bacon, diced
1 large chopped onion
1 cup sour cream
black pepper to taste
Directions
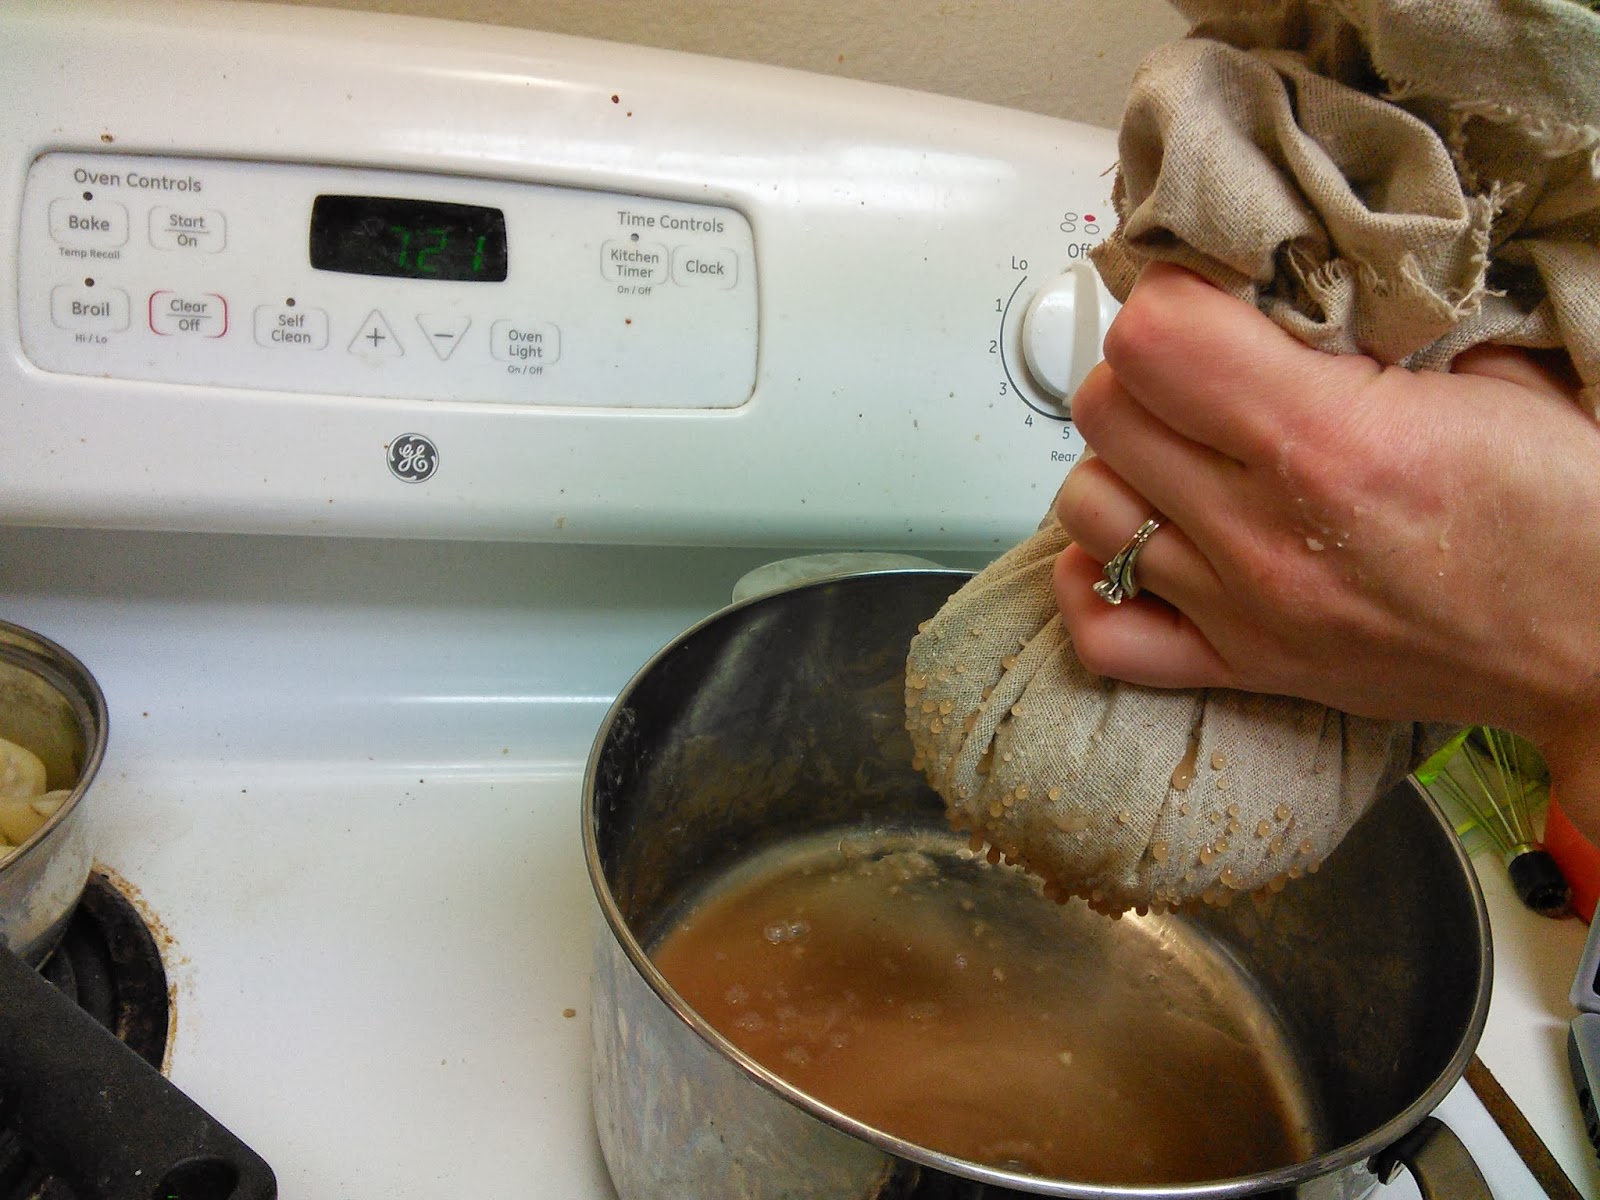
1. Make the sausage: cook the bacon & Saute onion with it in it's fat. (if using butter- just saute onion in the butter). In a large bowl, combine riced/milled potatoes, onion, bacon, eggs, marjoram, salt and pepper. Once Mixed, I found my potatoes to be very liquidy, so I used a piece of cheese cloth and squeezed out the moisture. You may also add flour if you still feel it is too loose.
2. Stuff the mixture into the cleaned Hog casings. (be sure to salt and reseal leftover casings- they will be good for about 2 years preserved like that).
Stuff the casings in this manner:
1. Grab a funnel with a wide opening (2 cm- 4 cm), slide the casing onto the thin funnel end. This might be difficult at first- I used bacon grease to make it easier- but I'm not sure that was necessary. Be careful not to rip the casing as you put it on- they are pretty sturdy/elastic, but they will rip if you stress them out too much.
2. Once the casing is all on the funnel, slide some off and knot it. Then take some filling and push it through the funnel. You will be able to stuff it pretty tight- but don't use all the elasticity here; it will need some elasticity to hold it together when things expand as it is cooking. If you stuff it too tight, the casing will break off when it's cooking.
3. You can twist portions to make links or make a long sausage (as is traditional). Make sure to leave enough casing on the end to knot it off.
4. Gently prick the casing in a couple areas so it can let steam escape.
3. Bring a pot of Salted water to a boil. Boil the sausages for 45 minutes, then drain & bake on a greased cookie sheet in a 350 degree oven for 15 minutes to brown the casing.
4. Make the Gravy: Pan fry the bacon & onion until tender. Add sour cream and black pepper & heat thoroughly. You may thin the gravy with a bit of milk.
~Enjoy!~

Struggling with the machine- it wouldn't push the filling through & when I used the plunger, potato splatted up and almost nothing came through the other end- this amount of sausages took about 20 minutes to produce.

Two minutes after deciding to do it manually, I was finished!

Because of all the spillage this is how much I was able to make- you will likely have more than this. Also, my biggest sausage was stuffed too tight and I did not prick it well & it fell apart in the boiling pot.
Sunday, March 9, 2014
Zeppelins ~ Cepelinai ~ Lithuanian Potato & Meat Dumpling
Zeppelinis
I took a lot of pictures with this one- this is my second attempt at Zeppelini. I think I grated my potatoes wrong the first time. See, In Lithuania, when they say grate the potatoes- they usually mean something less like grating cheddar cheese, and more like putting the potatoes through a food mill or using the strange side of the box grater. A lot of people like to use a juicer at this point. I, sadly, have no juicer. However, I have a food mill and my kids love it every time it comes out. I put most of the pictures of the process at the end for easier copy/pasting without the pictures.

Dumpling Mixture
8 large potatoes (peeled & milled)
2 Large potatoes (peeled, boiled, and mashed or riced)
1 medium onion (finely grated)
1 tsp salt (more or less)
Meat Mixture
1 lb ground pork
1 medium onion finely chopped
1 teaspoon salt
1/4 tsp pepper
1 large egg
Gravy:
1/2 lb bacon
1 large chopped onion
1 cup sour cream
black pepper to taste
Directions
1. In a large bowl, mix all the meat ingredients together and refrigerate until ready to use.
2. Mill the potatoes- add a few drops of lemon juice to them so they don't brown & place them in a fine mesh cloth- I used a muslin cloth. and squeeze the juice out of the potatoes into a bowl or pot. Set the bowl aside to let the starches settle to the bottom. Once it is settled, pour the juice off the top and with your hand, pull up the starch from the bowl and add it back into the potatoes. Mix all potatoes and dumpling mixture ingredients.
4. Put a large stock pot to boil on the stove. Add to it 3 Tbsp cornstarch and salt.
5. Wet your hands & take about 1 cup of Zepplini dumpling mix, flatten it in your hand, put about 1/4 cup of meat in the center, and seal the dumpling mixture around the meat. (At this point, I worried about the starch content of the dumpling and how it would hold up in the pot. I think it might be good to use extra starch next time. I also used the piece of Muslin I used earlier and I squeezed the dumplings into form. I liked how that improvisation went). Repeat with remaining dough and meat.
6. Carefully lower the Zeppilinis into the boiling water. Make sure the water returns to a boil, then simmer for 25 minutes.
7. While that's simmering, make the gravy- cook up the chopped bacon and onions in a pan, add sour cream. You can thin it with milk if you want to. Serve this warm over the zepplinis.
8. Carefully remove dumplings from the boiling pot and let them drain briefly before serving
~Enjoy~


Koldunai ~ Lithuanian Meat Dumplings (And Bonus: Sour Cream Bacon Sauce recipe)
.JPG)
Koldunai
I've made about three types of Lithuanian Ravioli. One was filled with a Beet & Ricotta mixture, another had an onion & mushroom filling, and this is one filled with meat. They were each something I would do again. Note- this picture shows an improper shape to my Koldunai. Normally, the edges of the half circle raviolis meet together to make a tortellini like shape.
Noodle Ingredient:
3 Eggs
2 Tbsp Water
3 cups Flour
Meat Filling:
1/2 lb beef
1 pinch of salt
1 pinch of pepper
1/2 an onion
2 eggs
Instructions:
1. Prepare the Filling: beat the eggs with salt and pepper, and add chopped onion.
2. Prepare the Noodle Dough:
A. Make a mound of flour & make a well within the mound. Pour 3 eggs and water and a pinch of salt into the well. Beat the egg with a fork & start to incorporate the flour with the fork. Incorporate as much as you can that way, then kneed it with your hands until it picks up most of the flour. You may add more water (1 Tbsp at a time) as needed to incorporate the flour. You will have a stiff, somewhat un-smooth, not very incorporated hunk of dough. Form the dough into a log shape and cut it into about 1/4 cup portions.
B. Get out a pasta roller & put it at the thickest setting. I like to put a plate with 1/4 cup flour at the end of the pasta roller so that I can dip it easily if the dough gets too sticky. Roll a portion of dough through, dip it in the flour and fold it in half and run it through, repeat this process until the dough comes through smooth and not sticky or broken. Then thin it out in the roller on the thinner settings. I rolled mine out to the 1/7" setting.
3. Cut 3" circles into the dough and place a Tbsp of filling on each circle. Seal the edges. You can dip a finger in water & run it along the inside of the circle to help it seal. Then, to make the proper shape, take the corners of the semicircle & pinch them together (sort of like Tortellini).
4. bring 3 quarts of water to a boil, pour in some salt, and drop the dumplings in. cook them for about 5 minutes & they're done.
5. Serve hot, with onion and sour cream.
Note: Lithuanians have a great love of sour cream- I personally prefer a white sauce with onion, mushroom, Parmesan, &/or Bacon pieces. You can also make a nice Bacon sour cream sauce by chopping up your bacon (about 2 pieces), then cooking it in a pan, then add some sour cream to the pan you cooked the bacon in, & heat thoroughly. You can put this sauce on almost any Lithuanian dish- Kugelis, Zeppelinis, Koldunai, Kibinai,
Saturday, March 8, 2014
Kibinai ~Lithuanian Empanadas~ Chicken Pillows
Kibinai

Making these reminded me a lot of making chicken pillows with my mom. It was one of our favorite recipes growing up... but my mom is not Lithuanian (my dad is). I decided to use chicken as my meat- I think that a ground beef would make the best flavor in this dish.
Ingredients
3 lb meat
2 sticks of butter
3 lb flour
3-4 onions
3-4 eggs
200 gr sour cream
Marjoram
Salt & Pepper
Directions
1. Separate eggs into a bowl, reserve yolks in a separate cup. Mix 1 tsp Salt and almost all of the sour cream into the whites.
2. In a separate bowl, use a pastry blender to cut room temperature butter into the flour. Add the egg white mixture to this and mix it well. This dough should be sticky. Put it in the fridge overnight (or just an hour or 2).
3. Shred meat & onions, add to them the remaining cream and spices, salt and pepper.
4. Roll out pieces of the dough. I found that what you want here is a relatively thin sheet of dough- I cheated towards the end and used my pasta roller to roll it to about 1/6-1/7" thick strips. If you have trouble with the dough being sticky & you're using a rolling pin, I suggest using more flour- you don't want your empanadas to be very sticky at this point. You could use Saran wrap beneath and on top of the dough to prevent it from sticking to things. Cut out 3"-4" diameter circles with a tumbler. Put a hunk of meat on each circle and crimp them together. The crimping process is my favorite part- it's beautiful & you should watch people do this on youtube- it's quick and elegant.
5. Beat the yolks and baste the pastries.
6. Bake at 350 for 30 minutes.
~I will be trying a meatless version soon- it has a cabbage and hard boiled egg filling~
-Enjoy!-
Spurgos (Lithuanian Doughnut Holes) A Fat Tuesday Treat

Ingredients
2 lb flour
3 oz Yeast (it's a lot of yeast- some people make the dough the night before for this reason)
2 Cups Milk
8 egg yolks
1 cup sugar
pinch of salt
2 tsp vanilla
Powdered Sugar
Oil for Frying
Directions
1. Use 1/3 of the flour (about 10 oz), the milk, sugar, and yeast. Blend well & let it rise for 30 minutes (it will double).
2/ Beat yolks and salt, add it to the dough. Add non-scaldingly hot butter, vanilla, & remaining flour (Here, I added rum flavoring because I so liked it in the Tirimisu that I thought- hey, let me not measure here and just throw some in because the original recipe for this called for rum. This addition did not make the doughnuts yummy- it made them a little odd tasting so don't do that thing I did). Mix well & cover to rise for about an hour.
3. Take rounded Tablespoons of dough in your floured hands and roll them into balls. Let them rise while you heat the oil. The crazy people that wrote the original recipe tried frying these for 8 minutes at 375- well, they were crazy, that's either too high or too long. at 375, the outside turns black while the inside is doughy. so take it down to the 350 range and watch your first few doughnuts, once they are golden, take them out of the pan and pull them apart to see how long it takes them to cook at that temperature. you should get somewhere under 2 minutes per side.
4. 2 options of coatings: Cinnamon sugar & powdered sugar. To coat- roll the spurgos in cinnamon sugar or dust them with powdered sugar (I used a wire mesh strainer to do this).
~Enjoy!~
Lithuanian Gira ~ Kvass ~ Lightly Fermented Rye Bread Drink

Cup of pre-bottled Gira: no foam (there's supposed to be foam)

Rye bread getting ready to hit the boiling pot
At first glance at this type of recipe, the Molly Mormon in me cringed and wondered about whether a fermented drink was in keeping with the WOW.
Well, justification #1. The WOW encourages us against strong drinks- technically, at .05%, this is not even hinting at being a strong drink... it's the same percentage of alcohol you get when you use mouthwash or drink homemade root beer, how alcoholic is my bread? It is fermented after all.
Justification #2. .05% is never ever ever going to impair a person's judgment. It is simply making a natural soda.
Justification #3. I have on good authority that the missionaries in Russia drink this stuff all the time.
Now... The second thing I had to tame was my uneasiness about eating things that count as science experiments and kitchen experiments at the same time... leaving something out in order that the bacteria will congregate is working against the grain for me.
Gira
14 oz black sourdough rye bread
3 liters water (about 3 quarts)
130 g sugar (1 1/8 c)
4 Tbsp Honey
1 Tbsp Natural Ferment or 1/2 packet yeast
optional sprig of mint (I didn't use this)
a few raisins
1. Chop up your bread and stick it in the oven at 300F for about 20-30 minutes. (sugars are caramelizing)
2. Pour the bread into boiling water. Let it seep for 4-12 hours.
3. Strain the liquid through a cloth (I used a piece of muslin over a wire strainer) & add warm water to make 3 liters. Stir in the sugar, honey, and fermenter of choice. (If using dry yeast: Activate it for about 10 minutes in 1/3 c warm water & a tsp of sugar.)
place it on the fridge for 12 hours... you will see foam when it's ready. You can taste it along the way to see how quickly the yeast is eating up the sugars. I got impatient here and also started to discover that I don't like yeasty flavored things... they make my bowels worry about yeast burps. So I cut things short & I ended up with a rye/yeast flavored, slightly carbonated, sweet drink. It wasn't supposed to be sweet. It's supposed to be bitter.
4. Skim the foam and strain the kvass into bottles. Put a raisin in each bottle and let the bottles sit in the fridge for 2-3 days as the yeast continues eating sugar.
By the end, the smell of everything made me uncomfortable. It tasted pretty good though- I liked my sweet and lightly fizzy drink (sparingly of course). I consumed about 1/2 of a bottle & the rest hit the sink. It smelled just like beer & I couldn't handle that. I think this was a one time cooking adventure... I like discovering things about food as I cook and I felt I learned a lot in this experiment. My Gira, you will notice pictured above in the cup, is pre-bottling & fridge fermentation & is without foam. Usually, there is foam. Now that I know & have seen how the foam on the alcoholic beverages is created by yeast, I am even more happy not to drink them. I might try Gira again if someone else makes it. I think that will be the extent of my wimpy trying of yeasted beverages though.
~You will likely do better than I did if you try making this!~
~Enjoy!~
Lithuanian Black Rye Bread

Lithuanian Black Rye Bread
This project took me a while to complete- my first natural yeast sourdough starter died & it takes the better part of a week for the yeast to multiply their numbers and create that signature sour flavor by eating up all the sugar. My natural rye sourdough starter was simple- 100g of flour each day for 4 days, mixed on day one with 120 ml warm water, then on days 2-4 using just 100 grams of warm water. You want to keep the starter in a nice warm place so the yeast will be very active. I'm borrowing a tip from a friend of mine- she keeps her things for fermenting on top of the fridge: it's warm, it's out of the way, it's perfect. I also covered my sourdough starter jar with a damp towel. Once it has a nice vinegary/yeasty smell, you can start making your bread and put your jar of yeast in the fridge- just feed it every other week by adding about 100 grams of flour & 100 ml warm water. or if you want to make some bread- after feeding the starter, put it on top of the fridge until it bubbles a lot and almost doubles, then measure out the amount of yeast you want, seal the jar and put it back inside the fridge.
Ingredients for Bread:
200 ml warm water (98 degree)
380 g Rye Flour
150 g Sourdough starter
100 ml warm water
2 Tbsp Sugar
1 Tbsp Honey
10 g salt
50 g wheat flour
Directions:
1. Add 100 Grams rye & sourdough starter to the warm water (98 degrees F). Cover & put it on top of the fridge for 12 hours or until it doubles.
2. Dissolve the sugar, honey, and salt into 100 ml of warm water. Add the water into the yeasted mixture (from the top of your fridge) with 230 g rye flour and 50 g wheat flour. Dough will be sticky
3. Oil a baking dish and pour the dough into the dish. let it rise for 3 hours (until it doubles).
4. Put the bread in the oven, then set temperature to 450. Once it hits 450, let it cook for 15 minutes. This high starting temperature makes the bread rise higher in the pan before it sets at the lower temperature. After 15 minutes, lower the temperature to 375 & bake it for 30 minutes more.
5. Once it's out, put a damp towel over it to soften the crust for removal from the baking pan. let the towel rest for about 20 minutes on the bread.
~Enjoy!~
This was probably the yummiest rye bread I've ever had- the honey flavor was still present and the bread had the traditional sour flavor & rye bite- Absolutely the perfect bread for grilled cheese. I ended up using most of my rye bread in making Gira, but I think I'll be making another loaf soon- after all, I have a jar of yeast in my fridge begging to be used in so many more breadventures.
Tuesday, February 18, 2014
Honey Spice Mushroom Cookies - Lithuanian - with & without cookie irons

I have long been intrigued by a set of 3 cookie irons we inherited from my Lithuanian grandmother. They had the name of a Lithuanian town on one- Druskininkai. 2 had forms for solid 3D mushrooms, and one had forms for 3D farm animals. I found that the Lithuanians made a honey mushroom cookie- which felt correct to make in the mushroom shaped pans. I could only find one recipe online at that time and it was not cooperating. The first recipe I tried for these included Cardamom- cardamom smells beautiful, but it is a very strong spice and easily overpowers the other flavors in the cookie. The recipe I chose this time had no cardamom- I like it much better. Perhaps that's simply because it turned out. You try it and see what you like- the Cardamom would be 1 tsp in this recipe.
Cookie Batter Ingredients
1/4 cup butter (room temp)
1/2 cup Sugar
2 Eggs
1/4 cup plain yogurt or sour cream (I did honey yogurt here)
3/4 cups honey (I did 1/2 cup honey)
4 cups all-purpose flour
1 1/2 tsp Baking Soda
1 tsp Cinnamon
1/4 tsp Allspice
1/4 tsp Nutmeg
1/2 tsp Ginger
Icing ingredients
2 cups powdered sugar
1/4 cup water
1 Tbsp lemon juice
1 Tbsp cocoa
Poppy seeds
(I didn't love my icing recipe- so I will likely tweak it next time- try vanilla instead of lemon or possibly use sour cream instead of water... I don't know how it will work, but I'm hoping to cut through the sweetness a bit)
1. Stir together flour, baking soda and spices.
2. In a separate bowl, cream together butter and sugar, add eggs 1 at a time, incorporating thoroughly after each addition.
3. Stir in the honey and yogurt.
4. slowly add the flour mixture & mix well. Chill it in the fridge for 1 hour or overnight.
5. Preheat oven to 375 F, prepare cookie sheets with parchment or a silicone baking mat.
6. Scoop 1 Tbsp cookie dough and roll it into a ball, take the rod end of a wooden spoon and make an indent in the cookie. I'd say, go for a good 2/3 through the cookie. It's ok if it completely flattens while it's cooking. The temperature of the dough has the most effect on its finished shape (make sure the dough is cold).
7. For the stems, roll 1/2 a Tbsp to 1 1/2" length & taper to a point on one end. Place these on a separate baking sheet.
8. Bake the caps for 10-12 minutes & the stems for 8-10 minutes. For 90% of the caps, they closed too much and I had to use a knife and carve out a deeper hole.
9. Prepare the Icing- mix together the icing ingredients (except the cocoa & poppy seeds). This is your glue. dip the point of the stem in the icing and stick the other end in the hole of the cap. I used a muffin tin to help support the mushrooms as they dried. They lie diagonally in the muffin tin, the stem resting on the rim, the cap in the cup. Once the glue has dried, you may decorate them.
10. To decorate: first, mix the cocoa into the icing. Second, you may dip the caps in the icing & sprinkle a few poppy seeds over top. Third, you may also dip the bottom of the stem in the icing and dip it in the poppy seeds.


Cookie Iron directions:
If you are cool like me and have a set of cookie irons, then spray some cooking spray on each side, and smush cookie dough into 1/2 of the mold. Put them on the stove over med-high heat for 1-2 minutes per side. Voila, perfect little cookies. (These will be slightly more dense than the version cooked in the oven.)
******************************************************************************


Secondary Cookie Iron Recipe:
I discovered that the cookie irons were originally suited for a different cookie. A Russian cookie similar to their Oreshki "little walnuts". Except, instead of a hollow walnut shaped cookie (which gets filled with caramelized sweetened condensed milk), these irons made a 3D solid cookie. They advertised that if you bought the cookie irons from this Russian manufacturer, they would give you the "Sweet Mushroom Cookie" recipe. I was unable to find this recipe elsewhere on the internet. I did however, find a video on youtube which features a person making the cookies- with no sound and no written directions. I watched carefully and tried to discern the foreign ingredients & inexact measurements and I'm pretty proud of what I came up with. It's very yummy.
Oreshki Style Sweet Mushroom cookie (solid)
2 Sticks Butter (1 cup)
2 Eggs
1 tsp Vanilla
1-3 Tbsp Sugar
1 Tbsp Baking powder
1 tsp Vinegar
2-3 Cups flour
1. Mix together the butter, eggs, sugar, and vanilla.
2. Add the Baking powder and vinegar. Mix again.
3. Add enough flour to make a workable dough (thick, not very sticky- a little sticky).
4. Spray some cookie spray on the cookie irons.
5. Smush portions into one side of the cookie iron & cook over your stove top at medium/medium high heat for 1-2 minutes on each side. You may check them after 1 minute.
~Suggestion: Caramelize some sweetened condensed milk & use it as a dip for these cookies. It is delicious!~
Blind Pigeons- Lithuanian Stuffed Cabbage Rolls- Balandeliai
I chose to do Lithuanian cooking in February because my dad is Lithuanian. His grandparents immigrated in the 1900s. My Grandmother was quite a good cook & this is one of the recipes my dad remembers eating. I am a novice in the Lithuanian kitchen, so I'm making mistakes... like grating my potatoes wrong & using an embarrassingly small amount of eggs in my Kugelis & using a recipe variation which is less traditional- using crackers in the blind pigeons instead of rice (Grandma's had rice in them). Oh well... I can adjust & do things more correctly next time.


Here is the recipe for Blind Pigeons:
1 large head of cabbage
5lb Ground Pork
2 tsp Seasoned salt
1 tsp Salt
1/2 tsp Pepper
1 tsp Ground Mustard
1 tsp Marjoram
3 Eggs
3 Cloves garlic
2 medium onions
1 Sleeve of crackers (or 1 cup of cooked rice)
3 Stalks of celery
7 cups of tomato puree (I used diced tomatoes and I pureed them with the immersion blender)
9 cups tomato soup
(Reserved 4 cups cabbage water)
Optional- Sourdough bread
Optional- Sour cream
1. Take your cabbage, place it upside down on your cutting board and hollow out the core with a knife. Fill a stockpot with water and put your cabbage in- it should be enough water to cover the cabbage- but the cabbage will float at first. You may add salt to this pot. Bring the water to boiling and let it boil, covered for 10 minutes- then take it off the heat and let it rest while you prepare the meat.
2. Mix the seasonings into the pork (seasoned salt, salt, pepper, mustard, marjoram) using your hands. In a blender, process the onion, garlic, eggs, celery, and crackers {if using rice- do not put it in the blender, just mix it into the meat}). Pour this over the pork and mix it in thoroughly.
3. Place 2 big pots (stock pots if you have them) on the stove. Put in each pot 3 1/2 cups puree, 4 1/2 cups tomato soup, and 2 cups of the cabbage water. Turn heat to medium.
4. Assemble the pigeons! Pull the cabbage out of the water and place it on a big plate. Carefully peal the leaves off of the cabbage (so you don't tear them). Place the leaves in a pile on another plate. Take 3/4 cups of the pork mixture and place it in the center of each cabbage leaf. Fold the thick part over the pork, then the top of the leaf, then the sides. Carefully lower it seam side down into a pot of tomato. repeat with remaining leaves and meat until you can make no more. Make meatballs out of the remaining meat & put the remaining little cabbage leaves in the tomato pots as well. (You will likely run out of room and need to do these when the pigeons are all done).
5. Cook the pigeons for (well, My recipe called for 3-5 hours- I did 3 & they were perfectly wonderful. Other people's recipes call for cooking them for only an hour- I didn't try that. So, check them after 1 hour- they may be good). Carefully remove the cabbage rolls from the pot. I had to refold them as I took them out- no big deal. Serve with a dollop of sour cream if you want and sourdough bread.
~You can make a smaller batch if you want; the recipe easily divides in thirds. Just put the pigeons in the pot first & pour the tomato stuff over them. Simmer for 1 hour. It can also be done in a crock pot.~
My Review: This makes a ton of blind pigeons (ok- like 20-25). We definitely had leftovers, but I'm not complaining- they are so good. They remind me some of Eggplant parmesan- I think that the tomato sauce made the cabbage leaves magical. The meat smelled amazing as I was making it and it definitely delivered on flavor. This is recipe turned out something that I would happily order in a restaurant and expect to pay like $12 or more.
The Cabbage Rolls & Sourdough
My husband put wings on his Pigeon.
Thursday, January 16, 2014
Mabo Tofu
I am showing both the cheater recipe and the full recipe. We prefer the cheater recipe. This is not a dish to miss out on.
Cheater Recipe:
Cook-Do MaboTofu Sauce Packet
Firm Tofu (cut into small cubes with knife)
1/4 cup chopped Green onion
1/4 lb ground pork
1. Brown the pork over med-high heat.
2. Add Tofu and Mabo Tofu Sauce- heat through.
3. Garnish with green onion.
Making your own Mabo Tofu sauce:
Ingredients:
1 Tbsp grated fresh Ginger (or 1-2 tsp powdered)
3 Garlic cloves, minced (about 1 1/2 tsp Garlic)
2 Tbsp Soy Sauce
1 Tbsp Fish sauce or Oyster sauce
1/2 cup chicken broth (or Dashi broth)
1 Tbsp Corn Starch
**optional 1 tsp- 1 Tbsp Hot chili sauce
** optional 1 tsp- 1 Tbsp Black Bean paste
1. Mix this all together & use it in place of the packet used in the above recipe.
Serve over Rice.
Enjoy!
Nikuman or Steamed Buns
This is a lovely little treasure. Pillowy, somewhat sticky skinned steamed buns filled with whatever your tummy is craving. I've had them with pork filling, teriyaki beef, and curry. You can make them into a dessert recipe with some sweet red bean paste. I found the recipe easy to follow. I insist that if you attempt to make Nikuman, you watch this video & see how they're made. This is not a recipe that is easily followed otherwise. The video features a french poodle who narrates the recipe as the Japanese lady next to him assembles. Here are the main points to remember about making the bun part of the recipe:
Recipe for the buns with gram to cup conversion:
1 slightly heaping cup= 250 grams
1 tsp Baking powder= 5 grams
1 tsp yeast
5 tsp (or 1 Tbsp + 2 tsp) Sugar = 25 grams
1 Tbsp Sesame oil
1/2 cup Dashi water *to be precise to the ml conversion, you may add between 2 tsp and 1 Tbsp to this*
(1/2 cup water and 1/2 tsp dashi stock)
Now, Remember the following directions!
1. To knead by hand for 10 minutes.
2. Then let the ball of dough rest in a bowl which is resting in pot of 104 degree water (I used a lidded pot) for 30 min.
3. Then section into 8 balls & let the balls of dough rest under a damp towel for 10 minutes.
~Form the Nikuman~ (excellent instructions on the video)
4. Warm up a pot with about an inch of water- just so it doesn't rise to level of the steamer basket (have it warm, not boiling) & turn off the burner. Put 4 Nikuman on wax or parchment paper and place them on a steamer basket in this warmed pot with space to rise. Put the lid on the pot and wait 10-20 minutes.
5. Then turn the water to a boil. Once it has reached a boil, turn off the burner and let the lidded pot rest for 15 minutes. ~Done!~
Other tips:
For a faster turn out of the steamed buns, stacked steamer baskets are sold. This way you can steam more than 4 at a time.
I really loved the recipe provided by "Cooking with Dog". The Nikuman were a fancy little treat & a definite must for our Japanuary. I used leftover Curry for the filling.
Another Japanuary cheat -Corn Pizza
In Japan, they serve corn on their pizza. The other day I was feeling quite burnt out and my husband used that little trick to keep Japanuary going. It actually tastes good in my opinion- not like "what have I been missing!?!" good, but just the "Huh, this doesn't taste bad." kind of good. So there's an option for cheating on Japanuary.
Monday, January 13, 2014
Cheaters Japanese Curry
I think this recipe counts as a cheat because I use prepared curry from a box. It is one of our favorite dishes though and it's rather simple. It's basically beef stew with a curry base served over rice.
Ingredients:
Rice
Golden crown box of curry seasoning
carrots
potatoes
meat of choice (pork, chicken, or beef)
onion
*any other vegetable you like in beef stew*
1. Start the rice in your rice cooker or however you prepare it.
2. According to the directions on the box- pour the appropriate amount of water in a pot & place the pot over medium high heat on the stove.
3. Cut up the vegetables. Add carrots and potatoes to the pot. I like to keep the onions separate and sautee them with the meat in a separate pot.
4. Once the carrots are soft, add the curry seasoning, cooked meat and onions. Stir and simmer until it is the consistency you like. I like mine fairly thick.
Scoop some prepared rice into a bowl and pour some of the curry over it. Enjoy!
~If you have leftover curry, lucky you! Stay tuned, I will be using curry in a steamed bun or "Nikkoman" more commonly known by it's Korean name "Dim sum".~
Kabobs
I am not sure if this one technically counts as "Japanuary" since my kabobs were not Japanese looking enough (says my husband), however, they were a huge hit with everyone in the family. You will need to have skewers for this project.
Ingredients:
Apples (I used 3)
Chicken
Sweet potatoes
Onion
Teriyaki Sauce
1. Cut up the apples & sweet potatoes into 1/4-1/2" thick x 2" pieces, quarter the onion, and cut the chicken into approx. 2" pieces.
2. Stack the pieces on a skewer (for onions, I used pieces that were 3 layers thick). Put finished skewers on a baking sheet. Once finished assembling kabobs, pour teriyaki sauce over all of the skewers and place in a 400 degree oven for 20 minutes.
My kids really loved the kabobs. It made for a very fun dinner- they were super yummy. I'll definitely be making them again.
Monday, January 6, 2014
Gyoza!!
Today I made Gyoza from scratch- Wonton wrappers and all. If the word Gyoza isn't familiar to you, maybe you know them by their American name "Pot-stickers". It was an event of sorts- but it's very satisfying to have the bowl of pork & cabbage filling and the rolled out wonton wrappers in front of you with little portions of filling on each one. It feels authentic. All of the sudden you're a fantastic cook and you're not even breaking a sweat. Recipe Time!
Wonton Wrappers:
2 cups flour in a small bowl
1 egg
1/4 tsp salt
1/3-1/2 cup water
1. Make a well in the flour.
2. Mix the eggs & salt- pour it into the flour well. Use a spoon or similar utensil to begin incorporation, eventually, you will need to knead with your hands.
3. Add a bit of water to help the flour incorporate. (if it gets sticky, just add a bit of flour and knead the dough till it's smooth-ish)
4. Roll it out very thin- if using a pasta roller, level 7. (dip in flour and continue if it gets sticky)
5. Lay the sheet of dough out and cut 2 1/2 inch by 2 inch squares- just approximate.
Pork Filling:
1/2 lb Ground pork (1 cup)
1/4 tsp hot oil
1/4 tsp sesame oil
2 Tbsp minced ginger
1 chopped green onion
3/4 cup napa cabbage
1. Bring a small pot of salt water to boil. Meanwhile, chop up & measure out the cabbage & prepare a bowl of cold water. Once the pot boils, blanch the cabbage and transfer it to the cold bowl.
2. Combine all ingredients.
Putting it together:
1. Drop portions of filling on the wontons and they will close easily- just fold the wrapper over the filling and pinch the sides together- try not to leave too much air inside the wonton.
2. Heat 1 Tbsp oil in a frying pan over med-high heat. put gyoza in making sure they all have their own space. Cook for 2 minutes.
3. Add 1/2 cup water to the pan & cover it for 5-7 minutes.
~Serve with white rice~
Sunday, January 5, 2014
Furikake: Easiest Japanese dish ever!
This one is a Gimme- a veritable cop-out. This is what you make when you don't want to make anything. Ingredients:
1. Packet of Furikake (also comes in a spice container)
2. Cooked Rice
Directions: Sprinkle Furikake over the rice and eat.
Furikake is simply rice seasoning. It contains various things: sea weed, dashi powder, bits of salmon or shrimp, ground up dried fish, salt, and sugar and other seasonings. It feels sort of like eating rice with fish food sprinkled over it. It is pretty. It is not a stand alone dish- it's might pass as a quick lunch. I suggest- if making it into a meal- serve Furikake alongside Edamame (Soy Beans) or crunchy apple slices and peanut butter. I don't know how Japanese apples and peanut butter are- but it makes the meal feel complete. You might also serve it alongside an egg dish or fry up an egg inside your rice and season it with Furikake (essentially making fried rice).
Happy Japanuary! Day 1: Oyakodon Buri
I have designated this month "Japanuary". We will be making Japanese dishes every night for dinner this month. Cooking Japanese food is amazingly cheap. I about cursed myself for not doing this earlier. There are some basics to start your Japanese pantry, and you might even have a lot of the things you need.
Here's your list:
1. Soy Sauce
2. Dashi (it's basically fish bullion)
3. Mirin & Sake (I just have Mirin)
4. Sesame oil (this one is optional)
5. Short grain white rice
6. Fish Sauce or Oyster sauce
7. Ginger (they usually want the root- not the powder)
8. Rice Vinegar
9. (Anything I left out)
I think that covers the basics- we had most of them because my husband spent a couple of years in Japan on a Mission. He was more than a little excited about Japanuary.
Yesterday we had a delightfully simple, ugly, yet elegantly flavored Oyakodon Buri. It's a basic soup that you serve with a slotted spoon over rice. Oyakodon means "mother child"; Buri means "over rice". I find this name grotesque because it doesn't refer to the loving relationship between a mother and child- but it refers to the use of chicken and eggs in this dish- so you are eating "mother child". Seriously? Well anyways, despite it's uncomforting name, it is a very comforting dish and we will definitely be making it often. It's so simple and elegantly flavored- you just get over the name and fall in love. So, here's the recipe:
Oyakodon Buri
2 cups Dashi broth
1/2 cup Soy Sauce
3 Tbsp Mirin
3 Tbsp Brown sugar
1/2 lb chicken- cut in pieces
1 small onion- chopped
1 cup approximate of your favorite mushrooms- cut up
4 eggs
2 green onions- chopped
1. Dissolve the Dashi, Soy, mirin, and sugar together over medium heat.
2. Add chicken pieces & onion, then mushrooms-- cook thoroughly (10-15 minutes)
3. Add 4 scrambled eggs and cook for about 5 minutes. Stirring is not necessary.
~Serve with a slotted spoon over a bowl of rice & garnish with green onions.~
As I said, it is not beautiful looking. I have some ideas about how to pretty up the dish. Also to note: not all recipes call for mushrooms and we added the green onions with the eggs instead of as an afterwards garnish. For a magazine ready Oyakodon Buri:
1. Cook chicken in a separate pan from the broth (with the onion & mushrooms if you're using them), And take about 1/4-1/2 cup of the broth to cook the chicken in & season it.
2. Once thoroughly cooked, lower heat & pour 4 scrambled eggs over the chicken.
3. Serve a portion of the egg/chicken from the pan over the bowl of rice & pour a bit of the broth over the bowl- sprinkle green onions over as a garnish.
Japanese Word for the day:
Pronounce "Ton oh Shee": you have just said, "Fun" in Japanese.
Subscribe to:
Posts (Atom)